Many ladies love switching up their style, the same way they probably do their wardrobe. I recently colored my younger sisters’ hair again for a third time. This time, using Dark and Lovely Fade Resistant Permanent Color in #379 Golden Bronze.

For those of you, natural or relaxed, and want to see how this DIY at home brand works on hair, read on to check out the before and after of this product. Note that my sister is predominately relaxed but her new darker new-growth is 100% virgin natural.
For my sister, I’ve been working to nurse her hair back to health. Just a month or so ago her hair was really thin and breaking off pretty roughly. As you can see in the photos, prior to color application, her hair was previously dyed a burnt clay red but it faded over the last few months looking brown.
I shared her previous red-color experience on Instagram over a year ago. With trimming her ends and keeping it away from a lot of manipulation, it’s getting its health back.

STEP 1: PREPPING THE HAIR
Naturally, you want to be able to easily and evenly distribute the color throughout the hair. In cosmo school, you learn to part the hair in sections of four. Hair coloring was my favorite portion when I attended and received my certificate in it. Part dry, unwashed hair into four sections.

STEP 2: GATHER SUPPLIES
When you open the box kit, you will notice it comes with instructions. Those instructions come attached with these massive gloves that seem to NEVR fit anyone. So of course, I make use of my own gloves because my hands are quite small. Thanks to my doctor’s office for leaving the glove box in the rooms, lol.
You want to remove the contents and you will discover that there are 3 products.
- Cream Developer
- Permanent Hair Color
- Moisture Rich Conditioner

You want to first remove the top from the cream developer and pour the contents of the hair color into it. Place the cap back on, and remove the very tip of the applicator bottle.
With your hands gloved, place one finger over the tip and begin to shake bottle (AWAY FROM FACE) to evenly mix its contents. If you follow the color chart, depending on how dark the hair already is, you will see what your expected outcome should look like. For her, she should expect to be between the black and medium brown end result.
STEP 3: APPLY COLOR ON HAIR

You want to go section by section when applying color. I always tend to grab a comb to help coat the hair evenly throughout. With the application, begin placing product around/on the roots (NOT TOUCHING SCALP) and work product downwards. From there add product throughout section of hair. Use a comb to gently comb color through. If hair is tanged, do not comb but instead, use fingers to work in product. Do this for each section until hair fully coated and bottle contents are empty.
STEP 4: TIMING + RINSE
If you are fully relaxed, your color should sit for 20 minutes. If you are fully natural, 30 minutes. You should begin seeing your hair color lift and lighten after 5-10 minutes, maybe 15 if hair is virgin.
After your processing time, hit the lukewarm water to rinse out product from hair. The mixture should turn into a lather as you work it thorough and remove. Rinse hair until you notice your water running clear from hair. Towel or shirt dry when done.
STEP 5: CONDITION + BLOW DRY + FLAT IRON
Take your moisture rich conditioner and apply it throughout your hair. Allow it to sit for about 3 minutes and wash out with warm water. When done, again, towel or shirt dry hair. This step is optional, but if you desire, you may air-dry your hair. She prefers blow-dry, so blow dry hair until it’s about 90%-95% dry.
If blow drying, part hair again into 4 sections and clip. Begin to flat iron hair in small sections as you work way through each quadrant. Make use of your desired heat protectant and light hair moisturizers.

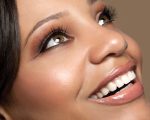
As you can see, the final results of using the Dark and Lovely Fade Resistant Permanent Color remain true to it’s advertising. The color pay-off is nice and vibrant. The hair after coloring did not feel brittle or dry but very moisturized. As a natural, I just MIGHT give this a try on my own hair but you never know. What do you think?
Have you ever used Dark and Lovely hair color products? Have they worked for you? Leave comment love below and share with your friends! 🙂


Beautiful
Wow, that's beautiful. Was your hair naturally dark?? X
Thanks! Yes, her hair is naturally dark.
Is your hair relaxed with tyoglicolate soft sheen ?
My hair isn't relaxed, the hair in the photos are of my sister.
The best thing is that your blog really informative thanks for your great information! I have got some important suggestions from it. id maker online
How did you get the tone of the dye show? Did u use bleach?
I'm very disappointedI brought 2 boxes of color 396 I left it on track hair for ova an HR and it still did NOTHING !
I did this same process on my hair and it lightened a tiny bit around my perimeter but nothing else changed left it on for 2 hrs.i know i know thats too long but i really wanted it to change color 🙍unfortunately it didnt my hair hasnt been dyed in over 5 yrs my natural color is like 1b i dont understand and i felt the dye shouldnt have been that watery at all.it was like jukce pouring on my hair and i stood there shaking it for over 10 minutes ..😕😳😰any suggestions?? Plz 🙏 cause i feel clueless as heck .btw her hair came out beautiful .enjoy ur day
You have to use the die right away or it doesn’t work. Not sure why but once I mixed it and didn’t apply for 20mins after and it did not take. I googled & YouTube to find that it loses effectiveness when not used rt away
Thank you for the clear instructions
Really appreciated
🙏🏾